Thursday, January 30, 2014

Gong Xi Fa Cai!!!


GONG XI FA CAI


Free Orkut and MySpace chinese new year Graphics Glitters


May this year of the Mighty Horse brings you good health, good fortune and prosperity to all!


See you in a week's time! 
Joyce


Wednesday, January 29, 2014

Sultana and Coconut Slice

"Blondies & Brownies and Bars", our theme for this week, at I Heart Cooking Clubs (IHCC)

This will be a short post, as I'm pooped from all the CNY baking, and my kitchen is "officially" closed, time to do some cleaning up, and after that I will be away to spend the Chinese New Year with my in-laws and my dad's. Can't wait to meet up with my sisters and families! 


Two of my favourite ingredients ; sultanas and coconut. I noticed Donna Hay's cup measurement, the weight in grams is not the standard ones that I always used. For flour measurement, I have always used the standard conversion of 1 cup equals 125gm. Hers is 150gm. Well, note my own changes (in blue) in the recipe below. And I have reduced the sugar for the topping by half, and the other half of the sugar is not missed at all. It is still a little sweet for me, as the sultanas do have a certain sweetness too.


A simple bar, nothing that special. 


It is nice with a cup of tea, though.


Sultana and Coconut Slice
(source from : donnahay.com)
150 gm butter, melted
1/2 cup (90 gm) brown sugar (70 gm)
1 cup (150 gm) plain (all-purpose) flour
1 cup (80 gm) desiccated coconut (60 gm)

Topping :
2 eggs
1 cup (175gm) brown sugar (1/2 cup)
1/2 cup (75gm) plain (all-purpose) flour, sifted
1/2 teaspoon baking powder, sifted
1-1/2 cups (240gm) sultanas

Preheat oven to 180C (355F). Place the butter, sugar, flour and coconut in a bowl and mix to combine. Press the mixture into a 20cm x 30cm tin lined with non-stick baking paper. Bake for 15 minutes or until golden. Set aside.

To make the topping, place the eggs and sugar in the bowl of an electric mixer and beat until thick and pale. Fold through the flour and baking powder and stir in the sultanas. Spread the topping over the base and bake for 25 minutes or until golden. Allow to cool in the tin and cut into squares to serve. Serves 6-8.
OT12/17/14

To see the delicious treats that everyone has made, stop by I Heart Cooking Clubs (IHCC).

IHCC Donna Hay Badge resized


Sunday, January 26, 2014

Kuih Rose

First of all, I would like to thank everyone for sharing all the wonderful cookies with our Bake-Along Theme : Chinese New Year Cookies. So far, there are 177 links! There is still another day, until tomorrow at 12 midnight, before the linky closes. I have not visited some of the links yet, but I'm coming to that, hopefully soon! I know that everyone is busy with cookies to make and other things to prepare for the coming festive CNY, and we (Lena, Zoe and myself), really appreciate the time you took to link your cookies posts! Thank you!

Today, I'm sharing another traditional cookies that is a favourite with all races, Kuih Rose. It is sweet and crispy with that wonderful aroma from the coconut milk and eggs. In our Nyonya household, we called these cookies as Kuih Rose, which is obvious, why it is named as such, from the shape of the cookies, which look like a rose. The Malay call these cookies as Kuih Loyang and the Chinese calls it, Honeycomb Cookies. 

These cookies however are a little labour intensive. Mixing the ingredients are pretty easy. The most tiring part is the frying of these cookies. It took me about 2-1/2 hours to fry about 2 tins of cookies (I use Jacob's biscuits tins). By the time I finished, my legs felt like after running in a marathon, alongside Zoe! Hi Zoe! :)
And I made these one more time, on the next day!

I have been frying these cookies for each Chinese New Year and even though I'm feeling pretty lazy this year, I could not, not make these! These are pretty addictive! Besides, my son has already asked me much earlier whether will I be making these cookies.  


You can find various recipes from the internet, but the recipe I'm sharing today is the one my beloved late mom used to make. 

Here's how the cookies are made :

 The Kuih Rose moulds, which I have been using for years.


  1. Sieve rice flour and plain flour in a large mixing bowl. Put aside.
  2. Beat eggs with a hand whisk in a large bowl. Add in caster sugar and whisk until evenly combined. 
  3. Pour the coconut milk into the egg mixture and whisk to combine. 
  4. Add the mixture to the flour and stir with a wooden spoon to combine. 


  1. The mixture will be lumpy. Use a hand whisk to whisk the mixture to break up the lumps as much as possible until mixture is smooth. 
  2. Place a large sieve over the large mixing bowl (you can use the same mixing bowl which you have used for the egg mixture), and pour the mixture into the sieve to remove any lumps. Discard the residue lumps. 

  1. The mixture will be smooth. 
  2. Meanwhile, get ready a small deep bowl with a small spoon. Pour some of the batter into the bowl. 
  3. To fry the Kuih Ros : Heat up a large wok and pour enough oil to deep-fry the cookies. When the oil is hot, add in the pandan leaves. It will bubble and pop! Remove the leaves when you can smell the fragrant aroma of the pandan leaves, and there are no more bubbles. Pandan leaves will be cripsy, discard the leaves.
  4. Place the Kuih Ros mould into the hot oil for 1-2 minutes to heat up the mould. Turn down heat to low.
  5. When the mould is hot, remove the mould from the hot oil and shake off excess oil back into the wok. 


  1. Stir the batter in the small bowl. Place the mould into the batter, until the batter comes to just below the top level of the mould. Do not cover the mould completely with the batter, otherwise you would have a hard time removing the cookie from the mould. (if it happens, then use a small knife to release it). 
  2. The batter would stick to the hot mould all around.
  3. Place the mould into the hot oil, do not release the mould or let it touch the base of the wok. 
  4. Wait for 2-3 seconds, then give a gentle shake, lift up the mould and the cookie should come off easily. Place the mould back in the hot oil for about 10 seconds to heat it up again and repeat from step 1. Always remember to stir the batter before you coat the hot mould with the batter.
  5. Fry the cookie on both sides until golden brown. Watch out for it as it would take only about a minute or so. Remove with a flat slotted ladle and drain on kitchen paper.
  6. Have ready a small wire sieve to remove all the bits and pieces of the batter during frying, you would not want them to stick to your Kuih Rose.


Drain the cookies on a flat cookie tray lined with newspapers and double layers of kitchen paper towels. Cool completely and store in air-tight containers.


Crispy, fragrant Kuih Rose


Kuih Rose
(recipe : Bibik Chwee)
300gm rice flour
60gm plain flour
5 large eggs
300gm caster sugar
250ml freshly squeezed thick coconut milk, add enough water to make 1-3/4 cup
2 pandan leaves, cut to 4-5" sections
cooking oil

  1. Sieve rice flour and plain flour in a large mixing bowl. Put aside.
  2. Beat eggs with a hand whisk in a large bowl. Add in caster sugar and whisk until evenly combined. 
  3. Pour the coconut milk into the egg mixture and whisk to combine. 
  4. Add the mixture to the flour and stir with a wooden spoon to combine. It will be in lumps. Use the hand whisk to whisk the mixture to break up the lumps as much as possible until mixture is smooth.
  5. Place a large sieve over the large mixing bowl (which you have used for the egg mixture), and pour the mixture into the sieve to remove any lumps. Discard the residue lumps. The mixture will be smooth.
  6. To fry the Kuih Ros : Heat up a large wok and pour enough oil to deep-fry the cookies. When the oil is hot, add in the pandan leaves. It will bubble and pop! Remove the leaves when you can smell the fragrant aroma of the pandan leaves, and there are no more bubbles. Pandan leaves will be cripsy, discard the leaves.
  7. Place the mould into the hot oil for 1-2 minutes to heat up the mould.
  8. Meanwhile, get ready a small deep bowl with a small spoon. Pour some of the batter into the bowl. 
  9. When the mould is hot, remove the mould from the hot oil and shake off excess oil back into the wok. Turn down heat to low.
  10. Place the mould into the batter, until the batter comes to just below the top level of the mould. Do not cover the mould completely with the batter, otherwise you would have a hard time removing the cookie from the mould. (if it happens, then use a small knife to release it). The batter would stick to the hot mould all around, place the mould into the hot oil, do not let it touch the base of the wok. Wait for 2-3 seconds, then give a gentle shake, lift up the mould and the cookie should come off easily. Place the mould back in the hot oil for about 10 seconds to heat it up again and repeat from step 9. 
  11. Fry the cookie on both sides until golden brown. Watch out for it as it would take only about a minute or so. Remove with a flat slotted ladle and drain on kitchen paper.
  12. Leave to cool completely and store in air-tight containers.
Tip :
~ Use a flat slotted ladle.
~ Use a large cookie tray, line with double layers of newspaper, then double layers of kitchen paper towels.    You would want to maintain the shape of the Kuih Rose, so use a flat cookie sheet for this step.
~ Have ready a small wire sieve to remove all the bits and pieces of the batter during frying, you would not want them to stick to your Kuih Rose.

******************

To join our blog hop, bake any Chinese New Year Cookies and link your post to our Bake-Along linky. The link will stay open for three weeks, from 6th January until 27th January.
Please visit my baking buddies, Lena from Frozen Wings and Zoe from Bake For Happy Kids, and all our friends who has baked along with us in the linky below :

Bake-Along shall take a break in February and we shall meet again in March for our Bake-Along #58 , with our bake, Cream Cheese Brownies from How To Be A Domestic Goddess, pg 194 by Nigella Lawson or you may get the recipe here. The linky will start from 6th to 15th March.


Photobucket


A friendly reminder when linking to our blog hop :
1. Please mention Bake-Along event in your own post linking direct to any of the hosts' post (JoyceLena or Zoe)
2. Please link only new and current post, related to the current bake or theme provided by us. Unrelated post will be deleted.
3. Feel free to display our Bake-Along badge in your post

To join our blog hop, click on the link to get the codes :
get the InLinkz code

Friday, January 24, 2014

THB : Milk Chocolate-Walnut Coffee Cake

It's bake-time at The Home Bakers (THB), and this week's bake, Milk-Chocolate-Walnut Coffee Cake, is selected by Eileen of Hundred Eighty Degrees.


This is a simple coffee cake, where the cake is layered in the middle with a mixture of cinnamon and sugar, and I have used brown sugar in place of white sugar. The recipe calls for finely chopped milk chocolate, but I do not like to chop chocolates as it can get very messy. So I have used chocolate chips instead. Half of the chocolate chips are sprinkled over the mixture and top with the rest of the cake batter. The top of the batter is then sprinkled with the remaining half of the cinnamon-sugar mixture, chocolate chips and nuts of your choice, I have used walnuts.


I've made half a recipe using a 6" round cake pan, and it takes about 30 minutes at 350F until it is done. Serve the cake warm or at room temperature.


This cake smells wonderful while it was baking, and it rose beautifully. 


A delicious cake. Simple and good! It has a soft, tender moist texture and  of course the pairing of cinnamon, sugar and chocolate are always a winning combination. This is one cake that I would not mind making again.

For the full recipe, drop by Eileen of Hundred Eighty Degrees. To view other members' bake, please visit The Home Bakers (THB).

Welcome to The Home Bakers


We are a group of home bakers who are currently baking from "Coffee Cakes" by Lou Seibert Pappas, until each recipe from this book has been baked. This is our bake no. 30 and we have 30 recipes more to go. If you are interested to be a member and join in our bakes, you may drop me an email at kitchenflavours@yahoo.com.

CB6/14

Thursday, January 23, 2014

Ricotta Ice Cream

I was going thru my drafted posts and realised that I have not posted this delicious ice cream which I've made quite sometime ago using my Homemade Ricotta Cheese, which I have posted before.  So I'm submitting this post to Little Thumbs Up event, where the ingredient for this month is Cheese.


This Ricotta Ice cream has a very creamy and smooth texture.


One scoop is not enough.


Yummy!


I'm wishing that I have some right about now! Will have to wait until after the CNY is over, when I have time to make some Ricotta Cheese again, and this ice cream!

If I have not been visiting  as frequently as before, I do apologize, as am pretty busy this past week, with Chinese New Year is just round the corner. I have been busy making some cookies and snacks and above all that, with housework and meals to prepare, so time is rather limited. I'm sure most of us who are celebrating CNY, are pretty busy right now! At times like this, I wish I have a helper around! 


(I've made half a recipe using 1/4 cup sugar)
Ricotta Ice Cream
(source from : marthastewart.com)
1 cup sugar
1 cup water
3 cups fresh ricotta
2 tbsp honey
1 pinch of salt

  1. In a small saucepan, bring sugar and water to a boil, remove from heat. Refrigerate for at least 1 hour or until chilled.
  2. In the bowl of a food processor, combine ricotta, honey and salt until smooth. Slowly add chilled sugar syrup. Freeze in an ice-cream maker, following manufacturer's instructions.

I'm linking this post to Little Thumbs Up event, where the ingredient for this month is Cheese, organized by Zoe of Bake For Happy Kids and Doreen of My Little Favourite DIY, hosted by Alice of I Love.I Cook.I Bake


Wednesday, January 22, 2014

Peas with Eggs and Chourico

It's "January Potluck" at I Heart Cooking Clubs (IHCC). For this potluck week, we are given the choice to cook from any of our featured chefs' recipes. I have chosen to cook from Tessa Kiros for this week, a simple and delicious egg dish that I had for lunch.


There are only a few ingredients, green peas, chorizo sausage, garlic, onion, chopped parsley and egg. Really easy and quick to make, takes less than 30 minutes!

This dish may look very simple, but it is delicious! Firstly the onions are sauteed until brown and sticky, then the chorizo sausage, garlic and parsely are added in, stir for a couple of minutes until "it looks good", that's what Tessa Kiros says, well, I was wondering about that, but you will know it when it looks good, cause it WILL look good, and smells good too (the chorizo sausage!). The garlic clove is removed at this point, you may keep it aside to eat later. Peas are added in and season with some salt. Some water is added in, though I have used a lesser amount of water, and not the entire 1/2 cup (I made half a recipe for one serving). The peas are left to simmer for about 10 minutes until cooked but still have that nice bright green colour. By now the dish would have become almost dry, but still with a little moist to it. Make a space in the centre of the pan, pushing the peas to the side, and crack in an egg. Cover and let the egg cook, until the whites are set and the yolks are still soft. Serve with some sprinkling of sweet paprika over.


Lunch is ready! The peas are nice and tasty, they have absorbed the flavours from the chorizo sausages and the caramelized onions after the 10 minutes of braising. The chorizo sausage, of course is good! My daughter, who does not like green peas, finished half of what's on the plate!


The egg is yummy, with the white just set and the yolk runny, and with some sprinkling of sweet paprika, so good. I had this with some fried rice actually, and it goes really well with the rice. This dish would make a lovely one dish lunch.


Peas with Eggs and Chourico
(adapted from "Piri Piri Starfish", Tessa Kiros)
Serves 2
50gm (1-3/4 oz) chorico sausage
4 tablespoons olive oil
1 small onion, finely chopped
1 garlic clove, peeled and squashed a bit
1 tablespoon chopped parsley
400gm (14 oz) peas, fresh or thawed frozen
2 eggs
a little ground sweet paprika

Cut the chourico into thin slices (removing the casing if it seems thick), then in half and even into quarters (depending on its original size). Heat the oil in a large non-stick frying pan and saute the onion until it is golden and sticky. Add the chourico, garlic clove and parsley and saute for a few minutes until it looks good, then add the peas and season well.
Mix together so the flavours meld and add a cup of hot water. Simmer over high heat for about 10 minutes, until the peas are soft but still bright green and have just about drunk up all the water. Remove the garlic.
Make two spaces in the peas with a wooden spoon towards the edge, big enough to fit an egg each. Crack the eggs into the holes, sprinkle with a little coarse salt and put a lid on the pan. Cook until there is a thin, pale film over the eggs and the whites are just set with the yolks quite soft. Serve at once with a sprinkling of paprika and pepper if you like.
CB5/14

To view what my friends are cooking up for our January Potluck, please do drop by I Heart Cooking Clubs.


Monday, January 20, 2014

The Most Buttery and Crispiest Oatmeal Cookies!

These are the most buttery and crispiest oatmeal cookies! I have been on the lookout for crispy cookies, by crispy, I meant, totally crispy, crunch in each bite. My family does not favour cookies which are crispy on the outside and chewy inside, thus I seldom bake any cookies as most recipes are just that, crispy on the outside and chewy inside. On those times when I've made some chewy cookies, we do not have problem finishing it all up, as the recipes usually make a small amount, but it always ends with a request, "crispy cookies next time"! 

I found this recipe months ago, and only made it recently, for the coming Chinese New Year. This recipe was adapted from a lovely blog, Baking Bites, which I have always enjoyed reading. Nicole Weston is the person behind this lovely blog, and she has even authored a baking cookbook, The Baking Bites Cookbook. She got this recipe from America's Test Kitchen and has adapted it slightly by reducing the amount of butter used. The original recipe uses almost double the amount of butter! Gasp!!!

I have adapted Baking Bite's version slightly by reducing the amount of sugar by half, and it turns out great, not too sweet, just right! The original recipe uses unsalted butter and some coarse sea flakes is sprinkled over the unbaked cookies before they go into the oven. I have instead used salted butter and omitted the sea salt, both in the batter and for sprinkling. And I have used big flakes rolled oats, process them in the food processor until they are finely coarse. I have adapted my way of "flattening the cookie batter" before baking, which works out easier for me.


These Oatmeal Cookies are really buttery with a light crispiness in each bite, almost melting in the mouth. So  good! 

Here's how I made these cookies :  **


  1. To make the cookies uniform in size, I have made a template by drawing 2-1/2" circles on a piece of large paper (the size of the baking tray). Place the template on the baking tray, and place a piece of baking parchment or silicone mat over it. 
  2. To make sure that the cookies have the same thickness, I have scaled the cookie batter at 10 grams each. Place them on the baking tray, in the centre of the circle which is visible.
  3. Have ready a spoon and a small bowl of water. Dip the spoon into the water, shake off excess water. 
  4. Use the back of the spoon to flatten the cookie batter, in circular motion until the batter fills up the circle. Neaten the sides all around with the back of the spoon. You will need to dip the spoon in the water two or three times for each batter as it will stick to the spoon. Always shake off excess water for each dip.
  5. Remove the template from under the baking parchment. The cookie batter are ready to be baked. 
  6. To get crispy cookies, the flattened cookie batter should be quite thin.


Bake them at 160C for 15-18 minutes. I have baked two trays at one time, rotating the two trays at half time, and back to front. Bake until the cookies are brown. Allow cookies to rest on baking tray for two minutes. To remove cookies, it is easier to lift up one corner of the baking parchment gently and the cookies will come off easily.


Transfer them to a wire rack to cool completely. Eat one (you will reach for the second one!) and store the rest in an airtight container. Makes about 60 cookies.


These are delightfully crispy! Great with a cup of hot black coffee or tea. I have already made this twice and would be making this again soon, the first batch (for testing!) are all gone. I'm keeping the second batch for the coming CNY and will be making another batch soon. I can see that I'll be trying this with some desiccated coconut in the future! Oh yes!


note : my changes in blue
Thin & Crispy Salted Oatmeal Cookies
(adapted from Baking Bites, who adapted it from America's Test Kitchen)
1 cup all purpose flour
3/4 tsp baking powder
1/2 tsp baking soda
1/2 tsp salt (omit this)
3/4 cup butter, at room temperature (I use salted)
1 cup sugar (scant 1/2 cup)
1/4 cup brown sugar (1/8 cup)
1 large egg
1 tsp vanilla extract
2-1/2 cups oatmeal (pref. quick cooking) (I use rolled oats, processed in food processor until finely coarse)
approx 3/4 - 1 tsp coarse kosher or sea salt
  1. Preheat oven to 350F. (I baked mine at 160C). Line a baking sheet with parchment paper.
  2. In a medium bowl, whisk together flour, baking powder, baking soda and salt.
  3. In a large bowl, cream together butter and sugars until mixture is creamy. Beat in egg and vanilla, followed by the flour mixture. Stir in the oatmeal, mixing just until the oats are well-distributed and no streaks of dry ingredients remain in the batter.
  4. Shape dough into 1 inch balls and arrange on baking sheet, leaving about 2-inches between them to allow for spread. Gently flatten each ball (so it is about 1/2 as high) with your fingertips, then sprinkle cookies with coarse salt. (I find that the batter sticks to the fingers, so I have used a spoon, dip in water ; refer to my instructions as above **)
  5. Bake for 12-15 minutes, until cookies are golden brown and cooked through.
  6. Allow to cool for 2-3 minutes on the baking sheet, then transfer to a wire rack to cool completely.
OT8/12/14

******************

To join our blog hop, bake any Chinese New Year Cookies and link your post to our Bake-Along linky. The link will stay open for three weeks, from 6th January until 27th January.
Please visit my baking buddies, Lena from Frozen Wings and Zoe from Bake For Happy Kids, and all our friends who has baked along with us in the linky below :

Bake-Along shall take a break in February and we shall meet again in March for our Bake-Along #58 , with our bake, Cream Cheese Brownies from How To Be A Domestic Goddess, pg 194 by Nigella Lawson or you may get the recipe here. The linky will start from 6th to 15th March.


Photobucket


A friendly reminder when linking to our blog hop :
1. Please mention Bake-Along event in your own post linking direct to any of the hosts' post (JoyceLena or Zoe)
2. Please link only new and current post, related to the current bake or theme provided by us. Unrelated post will be deleted.
3. Feel free to display our Bake-Along badge in your post


To join our blog hop, click on the link to get the codes :
get the InLinkz code

Sunday, January 19, 2014

Cinnamon Cocoa Crisps

I wanted to make something really crispy and it has to be easy! Haha! Bought some fresh wonton wrappers from the market and set out to bake them, inspired by a recipe from a cookbook which uses sesame oil and sesame seeds, but none of us like it. So I decided to make my own flavour combination by using a mixture of ground cinnamon, sugar and cocoa powder. And used melted butter, and the result, it was crispy good. The only thing is, the fresh wonton wrapper is not so suitable, as it gives an aftertaste, of perhaps, too much alkaline in them? So I went to the supermarket and bought this brand "Lo Sam" (the only brand there) and it is for making dumplings. Baked a few to test, and it was good, without that aftertaste like the wonton wrappers did . If you want to give this a try, use the wrappers meant for making dumpling and NOT wonton wrappers.


I use "Lo Sam" dumpling pastry. There's about 24 wrappers in each pack.


These are so easy to make, even your kids could help. Here's how the crisps are made :


  1. Have ready some melted butter. Mix the brown sugar, ground cinnamon and sifted cocoa powder in a bowl. Place the wrapper on a working counter.
  2. Brush each wrapper with some melted butter.
  3. Sprinkle each wrapper with the sugar-cinnamon-cocoa mixture.
  4. Using a sharp knife, cut into half, and each half cut into three triangles. You may cut them into long strips if you want, but triangles are easier to store in a bottle container.


Place the triangles on ungreased baking sheet. Bake in a preheated oven at 175C for 7-9 minutes.


Bake until the triangles are crispy and the edges curved upwards slightly. I baked mine for exactly 9 minutes, adjust accordingly, to your own oven, it may take a minute more or a minute less. Make sure they are baked till really crispy, otherwise they will be hard instead of crispy. Cool on wire racks, which takes only about 5 minutes or so, and store in airtight containers.


These are really crispy and you would not stop at just one!


I used three packs of the dumpling wrappers, and got about 3 full containers with another one not quite full, which is for snacking before CNY!

Thank you to all the entries for our Chinese New Year Cookies theme, so far there are 91 links! Keep them coming! There are a few traditional cookies which I would love to try, but really wishing there is more time before CNY! 


Cinnamon Cocoa Crisps
24 pieces dumpling wrapper
some melted butter for brushing
1/4 cup brown sugar
1 tablespoon ground cinnamon
1 tablespoon cocoa powder, sifted
  1. Preheat the oven to 175C for 10 minutes.
  2. Mix the brown sugar, ground cinnamon and sifted cocoa powder in a small bowl.
  3. Brush some melted butter on one side of dumpling wrapper.
  4. Sprinkle some of the cinnamon mixture over.
  5. Using a sharp knife, cut into wrapper into two halves and cut each half into 3 triangles.
  6. Place on baking sheet (no need to grease), and bake in preheated oven for 7-9 minutes, until the triangles are crispy and they curved up around the edges.
  7. Remove to a wire rack and leave to cool. These cool really fast, about 5 minutes or so. Store in airtight containers.

******************

To join our blog hop, bake any Chinese New Year Cookies and link your post to our Bake-Along linky. The link will stay open for three weeks, from 6th January until 27th January.
Please visit my baking buddies, Lena from Frozen Wings and Zoe from Bake For Happy Kids, and all our friends who has baked along with us in the linky below :

Bake-Along shall take a break in February and we shall meet again in March for our Bake-Along #58 , with our bake, Cream Cheese Brownies from How To Be A Domestic Goddess, pg 194 by Nigella Lawson or you may get the recipe here. The linky will start from 6th to 15th March.


Photobucket


A friendly reminder when linking to our blog hop :
1. Please mention Bake-Along event in your own post linking direct to any of the hosts' post (JoyceLena or Zoe)
2. Please link only new and current post, related to the current bake or theme provided by us. Unrelated post will be deleted.
3. Feel free to display our Bake-Along badge in your post


To join our blog hop, click on the link to get the codes :
get the InLinkz code

Friday, January 17, 2014

Crispy Spiced Thai Chicken

"Passport to Asia", is our theme for this week at I Heart Cooking Clubs (IHCC), where we are cooking from Donna Hay's recipes. I have chosen this simple dish Crispy Spiced Thai Chicken, which really is just so easy, that it was done in just minutes! 


There really isn't much preparation, aside from the chopping of the kaffir lime leaves, red chilli and the coriander leaves, and which takes just a couple of minutes. The chicken fillet is marinated with egg white, rice flour, the chopped herbs and sesame seeds. I have added in a pinch of salt to taste even though the recipe do not require it, as there is a dipping sauce that goes with the dish. But I prefer the chicken to be properly seasoned. The chicken fillet are fried with just a little oil on both sides until brown, about 4-5 minutes on each side, drain and serve on greens with the dipping sauce on the side.

A very tasty chicken dish, I prefer eating it without the dipping sauce, as it is tasty on its own. This is great for lunch or a light dinner, if you are eating alone, as it really is fuss-free and in less than half an hour, you would be enjoying your meal!

Crispy Spiced Thai Chicken
(source from donnahay.com)
3 chicken breast fillets, quartered
2 egg whites, lightly beaten
2 tablespoons fine rice flour
2 red chillies, chopped
3 tablespoons chopped coriander (cilantro) leaves
4 kaffir lime leaves, shredded
3 tablespoons sesame seeds
2-3 tablespoons peanut oil
watercress sprigs, to serve (I use shredded lettuce leaves)

dipping sauce :
3 tablespoons soy sauce
2 tablespoons lemon juice (I use lime juice)
1 tablespoon brown sugar

Combine the chicken, egg white, rice flour, chilli, coriander, lime leaves and sesame seeds in a bowl. Heat a frying pan over medium heat. Add the oil and cook the chicken for 3 minutes on each side or until golden and cooked through. Drain on absorbent paper.

To make the dipping sauce, place the soy, lemon juice and sugar in a bowl and mix to combine. Serve the chicken on some watercress with dipping sauce on the side.  Serves 4.


To view what the others are making for this week's theme, drop by I Heart Cooking Clubs (IHCC). Want to join us? Find out more details from here.

IHCC Donna Hay Badge resized


Wednesday, January 15, 2014

Fougasse

The first Fougasse that I've eaten was an Olive Fougasse, which I bought from a  bakery in Mid-Valley, and I have not seen any other bakery that sells Fougasee. It was freshly baked and warm when I ate it, and it was good. I have forgotten about that bread until I've baked this Fougasse, and it was as good as the one I've eaten ages ago! 

This recipe is taken from "Baking By Hand", a book, which I bought quite sometime ago.  Just as the title of the book, the breads in this book are kneaded and made entirely by hand. This is the first recipe that I've tried and almost gave up when halfway thru making this bread. Why, because it takes a much longer time that I thought it would, and secondly, the dough is one of the wettest and stickiest dough which I've handled, similar to making a Ciabatta. I was so tempted to give up and dump the sticky dough. It sticks to everything, the bowl, the working counter, and my hands, even with sprinkling of flour! But then, it is stated somewhere in the recipe that "this dough is significantly looser, or wetter, than other dough recipes in this book". That prompted me to carry on, telling myself that if I've managed to handle this dough, somehow, it would make me more confident in trying out other recipes in this book, and there are many recipes that I want to try.

I've made half a recipe for two loaves, one is Seeded Fougasse and the other Cheese Fougasse.


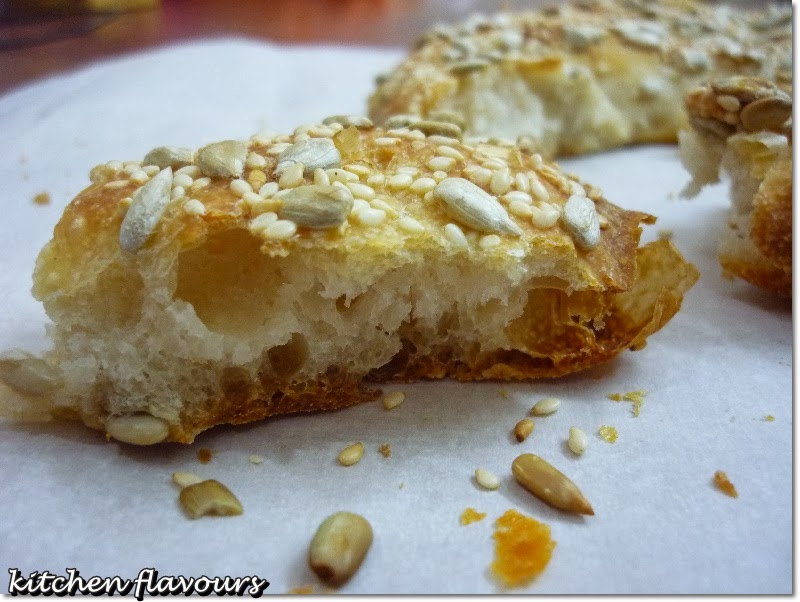
Seeded Fougasse, with sunflower and sesame seeds

Firstly you would need to make the biga starter, 12 hours before the bake. The next day, the biga is mixed with the rest of the dough ingredients as per the instructions in the recipe. I would not go on with the making of the bread, (you may refer to the instructions below). But plan ahead, if you want to make this bread, there are two-30 minute rests, then the dough is fold and let rest for 30 minutes, repeat three more times. This is a nightmare, I can't fold the dough, it was a sloppy sticky mess, I did the best I could, but how best can you fold a sticky mess of dough??. This is the part that I almost gave up, I thought I've failed with the dough at this point! After four times of "folding" the dough, let it rest for another hour. When the dough is ready, divide the dough into two (for half a recipe), shape into a round, and let rest for another hour. Finally, the dough can be shaped and baked. Mine took much longer, as I left the dough to rest for a bit more at each rest, as they are really sticky, and letting them rest longer did not help at all, it was still sticky.


Cheese Fougasse

Spread out the dough flat right on the peel, I've used a baking sheet, since I do not have a peel. The dough is still sticky, though it is less sticky at this point, I've got to sprinkle some flours over it. Spray the top of the Fougasse dough with water and sprinkle the topping of your choice. Cut a pattern of slits into the surface of the dough and spread out evenly with your fingers to form the patterns. Again I had problem with this too, as the dough seems to close back, and I've got to let the dough rests for every 5 to 10 minutes or so, and stretch them out again until the holes are visible. Maybe the dough are not ready yet, but it was already almost 9 pm and I was running out of patience. 

Bake the Fougasse dough as directed. I've used a baking sheet to shape the Fougase on and baked them directly still on the baking sheet, as I do not have a baking stone and peel. The Cheese Fougasse smells so wonderful when it was baking.


The Seeded Fougasse is simply good! 


Cheese Fougasse, even better! Utterly irresistible!
All the efforts and time spent on making these Fougasse, definitely paid off!

Between the Seeded Fougasse and Cheese Fougasse, I love this Cheese Fougasse, hands down! Just as the author advised as per the last sentence in the recipe below "eat immediately, or when your mouth can handle the heat". When eaten minutes after baking, while it was still fresh and warm, the crust of the Fougasse is so deliciously crispy (crunch! crunch!) and with chewy, open crumb texture inside, which is what we are looking for, that open-crumb texture!  I can't seem to stop eating the Cheese Fougasse, it was that good! 

One thing is, bake these when you plan to eat them immediately right after baking, as they get very chewy and hard as they cool down. The "hard" means that you would need to do some jaw exercising! LOL! Which I did the next morning, when I finished them all up. Which reminds me that the Olive Fougasse I bought from the bakery ages ago, turned really hard too, when it has cooled down. So eat them warm and fresh out of the oven! Do not wait! 


Fougasse
(adapted from "Baking By Hand", Andy & Jackie King)
Overview :
  • Yield : Four 1-lb/450 gm fougasse
  • Desired dough temperature : 85F/30C
  • Mixing time : 40 minutes
  • Bulk fermentation : 3 hours
  • Proofing time : 1.5 hours
  • Baking time : 25 minutes
  • Cooling time : 15 minutes
12 Hours Before The Bake :
Mix your biga 
9 oz/255 ml 75F/20C water
15 oz/425 gm white bread flour
1/4 tsp/1gm instant yeast
(Mix everything together and keep covered, at room temperature for 12 hours)

Baking Day :
1 lb 3.5 oz/550 gm biga
1 lb 4.75 oz / 590 ml 90F/32C water
1 lb 7 oz/650 gm white bread flour
3 tsp/22 gm fine sea salt

3/4 tsp/3 gm instant yeast

Fougasse variations :
9.5 oz/290 gm Kalamata or Sicilian olives, pitted (if making Olive Fougasse)
1 cup/180 gm shredded Parmesan or other hard cheese (if making Cheese Fougasse)
1/2 cup/80 gm sunflower seeds and 1/2 cup/80 gm sesame seeds, blended (if making Seeded Fougasse)

In a large mixing bowl, combine your biga and water, and remember to keep that water warm to give your yeast a comfortable atmosphere to grow. (It will help even mixing if you break the biga up into smaller pieces as you add it to the water). Then, dump your flour on top of the liquid ingredients, and mix it by hand for about 30 seconds, until it comes together in a shaggy mass. Don't forget to scrape the bottom and sides of the bowl regularly; you want all of that flour hydrated and don't want to see any dry spots. Set aside in a warm place, at least 80F/25C, for 30 minutes. If you're having trouble finding your warm place, it's time to use your trusty heat lamp.

Sprinkle the yeast and salt on top of the dough and grab a four-finger pinch of the dough and pull. It should stretch out like chunky taffy rather than just tear off. Incorporate the salt and yeast into the dough, continuously pushing the sides of the dough into the middle while turning the bowl. After a minute of this, the dough should be pulling away from the sides of the bowl and developing a bit of a sheen, and you shouldn't feel any crunchy salt (add your olives at this point if you're making Olive Fougasse). This dough will be significantly loose, or wetter, than other dough recipes in this book. Cover the bowl, and put it in your warm place for 30 minutes.

Turn your dough into a lightly floured surface and give it your four-fold. It should make a tight little package and after every fold the dough's volume should increase. It should consistently feel warm and active. Roll the dough over and place it, seam side down, back into the bowl. Repeat every 30 minutes (you'll fold the dough four times in total). After the fourth fold, leave the dough alone to develop volume for the last hour; those bubbles are what will make up the nice, open crumb of your fougasse. You're looking for the dough to be strong but puffy, warm to the touch and able to hold a fingerprint when pressed into the surface. The whole process will take about 3 hours.

When the dough is ready to divide, turn it out onto a well-floured work surface - this dough is a bit sticky, so some extra flour is necessary here. Divide it into four 1-pound/450 gm pieces, and gently preshape each one into a round. Let these pieces rest, covered with a cloth, for at least 1 hour.

While your dough is proofing, place your baking stone on the lowest rack in your oven, and your cast-iron pan on the highest rack. Preheat the oven to 450F/230C. When the dough is totally relaxed and you can press your finger into the surface and the print holds, you're ready to top and bake them.

It's easiest to top your fougasse right on the peel, so you can easily slide them onto your baking stone. If you're concerned about toppings dropping into the oven, line the peel with parchment paper and shape the fougasse on top of that. While the dough is still on the table, pat a loaf out until it is almost completely flat; then transfer it to the peel. Finish patting out until completely flat.

If making Olive Fougasse, no further topping is necessary.

If making Cheese Fougasse, spray your fougasse with water and sprinkle your cheese on top of the loaf, about 1/4 cup/45gm per loaf.

If making Seeded Fougasse, spray your fougasse with water and sprinkle an even layer of seeds on top of the loaf, about 1/4 cup/40gm per loaf. Top with a pinch of fine sea salt.

Grab your pizza wheel, and cut a pattern of slits into the surface of your dough and spread out evenly with your fingers. There is no shortage of traditional fougasse patterns, but I'm big on dedicating a pattern to a flavour and keeping it consistent.

Now, grab three ice cubes from the freezer. Being careful not to keep the oven door open too long and let the heat out, open the oven, slide your fougasse onto the stone, throw the three ice cubes into the cast-iron pan and close the door. A second spritzing of water into the oven is not necessary unless you're making plain fougasse, as the toppings will keep the surface moist. Bake for about 25 minutes, or until the sides of the crust are golden brown and the toppings have a nice, roasted colour (depending on the topping). Eat immediately, or when your mouth can handle the heat.
CB4/14

I'm linking this post to Little Thumbs Up event, where the ingredient for this month is Cheese, organized by Zoe of Bake For Happy Kids and Doreen of My Little Favourite DIY, hosted by Alice of I Love.I Cook.I Bake